
Masking tape is one of the most useful tools in decorative concrete. Faux flagstone, wood plank floors, tile grids and crisp borders are all made with it. Put the same tape on a floor you have just finished, and it can take the finish with it.
Two questions get confused constantly, and separating them answers almost everything:
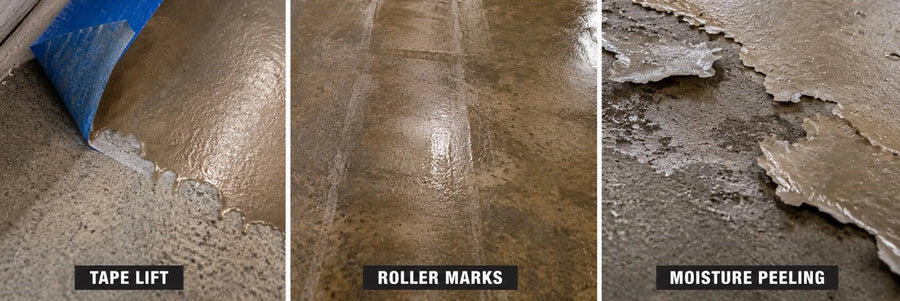
Tape lifting a coating is the first of the three failures we see most often on finished floors.
Why tape asks more of a floor than walking does
Tape carries a pressure-sensitive adhesive: glue that sticks under brief hand pressure, with no drying and no curing. It is soft enough to flow, so pressing it down settles it into every dip it can reach.
Which is exactly why a sealed floor gives tape a better hold than bare concrete does. Bare concrete is rough, so the adhesive touches only the high spots. A cured sealer is smooth and continuous, so the adhesive wets almost all of it. Nothing chemical happens between the two. The tape simply gets more of itself in contact with the floor.
Then, when you pull, most of the effort never goes into breaking that contact at all. It goes into stretching and deforming the soft adhesive as the peel travels along the strip. That is where the force comes from, and it is why a strip of tape can out-pull a coating that carries furniture without complaint.
And it grips harder the longer it sits
The adhesive keeps flowing after you stop pressing, working further into the surface, so the real contact area keeps growing for as long as the tape stays down. Peel strength is a function of time, not a fixed property of the roll. This is measured rather than theoretical: peel test standards pin the dwell period down precisely because the number climbs otherwise. Tape makers formulate against it, which is why 3M lists "controlled tack" and minimal adhesion build as a feature of its painter's tapes.
Practically: tape pulled up within the hour and tape left down over a weekend are two different products.
What makes a floor take longer to be ready
A water-based acrylic keeps developing its properties after it stops feeling wet. Some things extend that, and most of them are inside your control:
- Heavy coats. A thick coat dries from the top down. The surface skins over first and then slows the escape of what is underneath it, so a heavy coat is not simply a fast way to get two coats of coverage.
- Total layers in the stack. Stain, then sealer, then wax, each in multiple coats, is a lot of material. Every layer you add on a schedule sits on top of one that is still finishing.
- Cold. Everything slows down as the temperature drops.
- Humidity and still air. A closed room with no airflow is the hardest case. Water has nowhere to go.
None of that is a reason to worry about a normal job. It is the reason two floors sealed on the same day can be ready at different times, and the reason a schedule alone is not a reliable answer.
The test that actually answers it
Rather than counting days, test the floor you have. This takes two minutes and it is the only answer specific to your slab, your build and your room.
- Pick a spot that will be hidden: inside a closet, under where an appliance goes, behind a door.
- Press down a short piece of the exact tape you plan to use, the same way you would use it.
- Leave it for as long as you would actually leave it on the job. An hour is not a test for tape you intend to leave overnight.
- Pull it back on itself at a shallow angle, slowly.
- Look at the tape and at the floor.
Nothing on the tape and no change to the floor means you are good to go, in that spot, with that tape, for that dwell. Sheen dulled where the tape sat means the wax took it, which is the wax doing its job. Any color on the tape means stop. See below.
Which tape, and which to keep off the floor
Tapes are rated by peel strength, usually in ounces per inch, and the figure is published on the manufacturer's data sheet. Lower is gentler. The single most useful thing to know is that blue does not mean gentle: it is a color, not a specification.
| Tape | Typical peel strength | On a finished floor |
|---|---|---|
|
Delicate surface often purple or lilac |
About 14 oz/in | The gentlest option available. Still test it first |
|
Blue painter's the common choice |
About 20 to 23 oz/in | Reasonable, but test it first. This is the tape most of the damage we see comes from |
| Blue "pro grade" | About 32 oz/in | Blue, and half again as aggressive as the tape above. Check the number, not the color |
| Tan masking, general purpose | About 22 to 40 oz/in | No. Usually a rubber adhesive, which ages badly and is the chemistry associated with oily, staining residue |
| Duct tape | Around 57 oz/in | Never. Fine on bare concrete before you stain, never on a finished floor |
|
Vinyl electrical and floor marking |
Varies | Never. Plasticizer transfer out of vinyl into a coating is a measured effect, and marring is the documented result |
- Delicate surface (often purple), about 14 oz/in. The gentlest option. Still test first.
- Blue painter's, about 20 to 23 oz/in. Reasonable, but test first. Most of the damage we see involves this tape.
- Blue "pro grade", about 32 oz/in. Blue, and half again as aggressive. Check the number, not the color.
- Tan masking, general purpose, about 22 to 40 oz/in. No. Rubber adhesive, ages badly, oily staining residue.
- Duct tape, around 57 oz/in. Never on a finished floor. Fine on bare concrete before you stain.
- Vinyl electrical or floor marking tape. Never. Plasticizer transfer into a coating is measured, and marring is the documented result.
How to pull it
- Warm it first if it has been down a while. A hairdryer on low, held a few inches away and kept moving, softens the adhesive so it releases with far less force. Use a hairdryer rather than a heat gun, because a heat gun concentrates enough heat to soften the sealer itself.
- Fold it back on itself. Peel at a shallow angle against the floor rather than lifting away at ninety degrees.
- Slowly. A fast pull concentrates far more force at the edge than a slow one.
- In short lengths, so you can stop the moment anything starts to come with it.
Where tape belongs: on the board, not the floor
The most common way a finished floor gets damaged is trim work. The floor is done, the baseboards need painting, and taping a neat line along the bottom of the trim is the obvious move. That line runs along the floor, and the floor is sealed.
The sheeting still has to be held up by something. Hold it with the baseboard:
- Run the tape along the face of the baseboard, near its bottom edge, sticky side out and overhanging downward.
- Press your paper or plastic onto that overhang, so the sheeting hangs from the board and drapes across the floor.
- Weigh the loose edge down out in the room with a board or a length of pipe. Never tape the far edge to the concrete.
The tape only ever touches painted trim, which is a surface you are about to repaint anyway. If paint lifts off the baseboard, you cut in over it. Where you cannot hang sheeting at all, hold a stiff card or a metal paint shield against the joint and move it along as you cut in.
On a new project, mask before you seal
All of the above is about a floor that is already finished. On a new job the answer is simpler: tape belongs on bare concrete, and it is how some of the best floors we see get made.
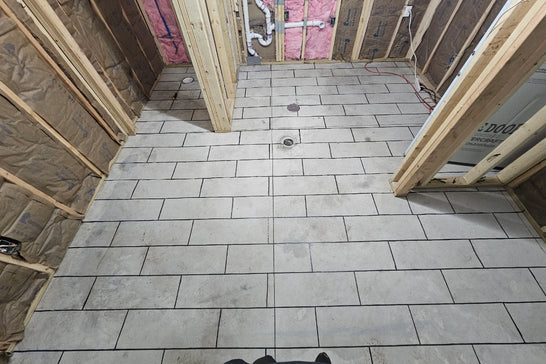
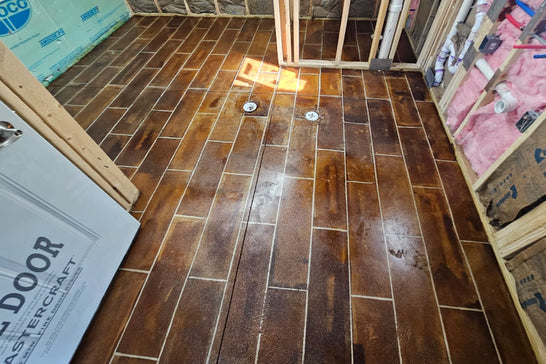
- Prep the bare slab.
- Lay the tape and press the edges down firmly.
- Stain.
- Remove the tape as soon as the job allows, following the instructions for your product. Do not leave it down longer than it needs, because tape grips harder the longer it sits.
- Neutralize and rinse if you used a reactive stain, and keep rinsing until the water runs clear.
- Let the slab dry completely.
- Seal last, over the finished pattern.
Tape never touches the floor again after step 7. For the full technique rather than the caution, see stencil concrete and how to stain concrete floors like wood.
If tape pulls color, that is not normal
This is the line worth remembering, because it separates an annoyance from a problem.
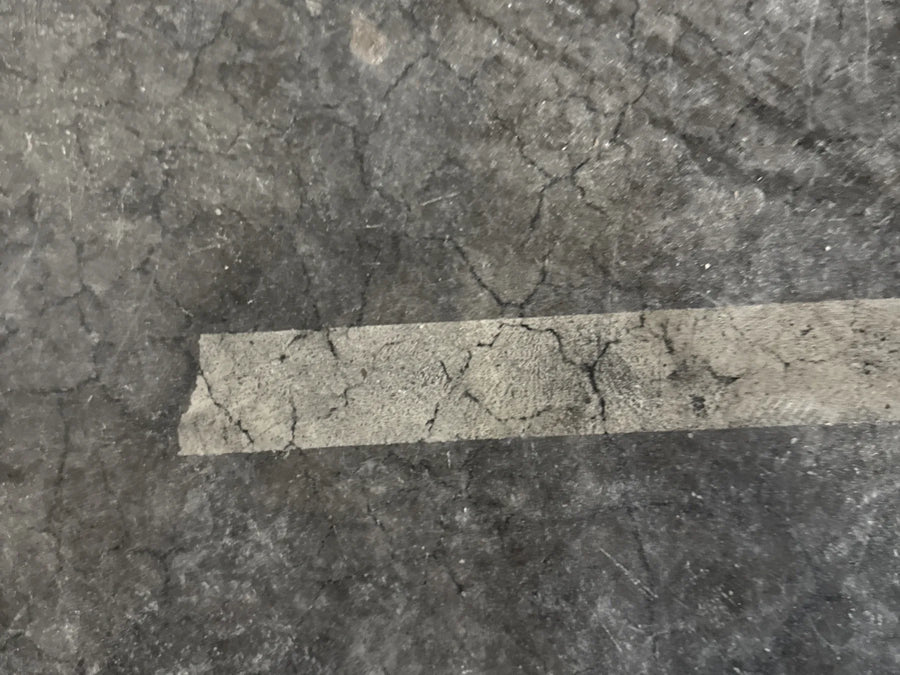
A real customer floor. The tape came up carrying the sealer and the color with it, down to bare concrete, in a clean strip the exact width of the tape.
- Dulled sheen, color unchanged. On an interior floor finished with ProWax Polish™, that is almost certainly the wax, which is the sacrificial layer doing exactly what it is there for. Wax refreshes with a mop and does not need stripping.
- Sheen gone, color still there. The sealer film lifted. The color is in the slab and the area needs the sealer rebuilt.
- Color lighter or missing. Stop. That means the sealer was gripping something other than clean concrete, and no amount of care with tape fixes what is underneath it.
The most common cause is residue. On an acid stained floor, if the reaction residue is not fully neutralized and rinsed away, the sealer bonds to the residue rather than to the slab. Our guide to neutralizing acid stain covers removing it, including the swipe test: run a hand across the dry floor before you seal, and if anything comes off on your palm, it is not ready.
If tape is already on a finished floor
Accidents happen. A sheet slips, or a strip gets pressed down to hold something. Do not simply pull it: warm it first, fold it back on itself, and work in short lengths, exactly as above. If the finish starts to lift, stop, warm that spot again and try a shallower angle.
Removing adhesive residue
Work up from the mildest option, testing in a hidden spot at each step:
- Warm soapy water and a microfiber cloth. More comes off this way than people expect, especially while the residue is fresh.
- Gentle heat, then a plastic scraper or an old card. Never metal, which will score the film.
- If the floor has ProWax Polish™ on it, the residue is probably sitting in the wax rather than in the sealer. Removing and reapplying the wax layer deals with it without touching the sealer underneath. Call us and we will walk you through it.
If the finish is marred
What you can do depends on which sealer is on the floor, because the two chemistries behave differently once cured.
- Solvent-based acrylic (EasySeal™, EasyTint™). EasyRepair™ re-dissolves the existing film and lets it re-level, so a tape mark can often be repaired without stripping anything.
- Water-based acrylic (HydroCryl™, AcquaSeal™). These cure partly by cross-linking and cannot be re-dissolved and re-flowed. EasyRepair™ will not work on them. Strip the affected section and reseal it.
Either way, resist feathering fresh sealer over a bare strip and hoping it blends. A patch over a hard edge reads as a different sheen from every angle. How to fix concrete sealer covers stripping and resealing properly.
Tape and sealed floors: FAQs
How long after sealing can I use tape on the floor?
Longer than you can walk on it, and there is no single number that fits every floor, because it depends on how many coats you built, how heavy they were, and how warm and well ventilated the room is. Rather than counting days, run the hidden-spot test above with the actual tape and the actual dwell time you intend to use. It takes two minutes and it answers the question for your floor rather than for an average one.
Is painter's tape safe on a sealed floor?
Safer than duct or tan masking tape, and not automatically safe. Blue painter's tape is around 20 to 23 ounces per inch, and delicate surface tape is around 14, so reaching for the gentler roll is sensible. But blue is a color rather than a specification, and some blue "pro grade" tapes are half again as aggressive as the standard blue. Check the figure on the data sheet, and test before you commit.
Can I tape over stain that has not been sealed yet?
Yes, that is normal for multi-color work, provided the stain has finished reacting and the slab is dry. The surface is still bare concrete carrying color rather than a film, so there is nothing for the tape to lift. Keep tape off once the sealer goes down.
What tape should I use for a stencil pattern?
On bare concrete, whatever gives a crisp edge and comes off cleanly. Customers have used masking tape, duct tape and branded painter's tapes successfully for flagstone, tile and plank designs. What matters more than the brand is pressing the edges down well so stain cannot creep under, and removing the tape on schedule rather than leaving it to bake on.
Tape pulled color off my floor. What now?
Stop taping, photograph the tape line, and get in touch. Color coming away means the finish was not bonded to clean concrete, which is a cause worth identifying rather than working around. It is usually diagnosable from a photograph, and the fix is different depending on what the photo shows.
What's next
- How to apply concrete sealer, including coat schedules and the mistakes that ruin sealer jobs
- Neutralizing acid stain, and the swipe test that says a floor is ready to seal
- Stencil concrete, the full tape and stencil technique
- How to stain concrete floors like wood, plank patterns laid out with tape
- How to fix concrete sealer, if a finish has already been damaged
- ProWax Polish™, the sacrificial layer that takes the wear instead of your sealer


