
Surface preparation is the whole ball game. Every failed staining project we get called about failed here, before a drop of color went down — a floor that was too dense to absorb, glue residue nobody could see, an old sealer still in place, oil that had soaked in years ago. Stain is a chemical reaction with the concrete, so if anything stands between the two, you get that thing back instead of the color you chose.
This guide is the diagnostic order: test the slab, work out what is on it, remove that, then verify before you commit.
Prefer to listen? Shawna Turner covered profiling, the water test, and the etcher that ruins a slab for acid stain. The player is at the end of this article.
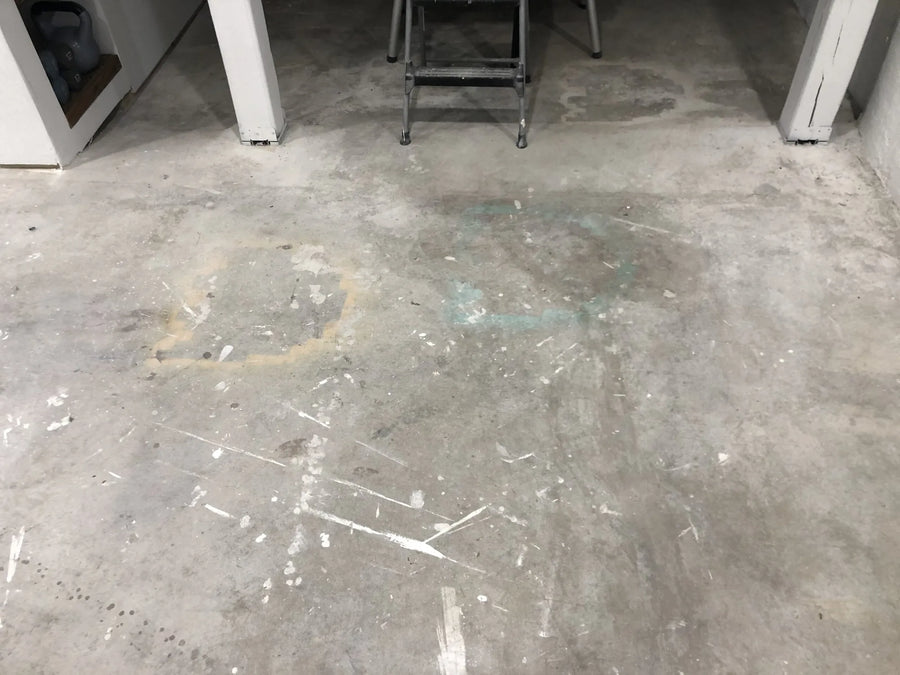
The realistic starting point — a basement slab with old stains, spray paint and overspray on it.
Step 1: test the porosity, because it decides everything else
Spray water on the concrete and watch what it does. This takes ten seconds and tells you more than any visual inspection. There are three possible answers.
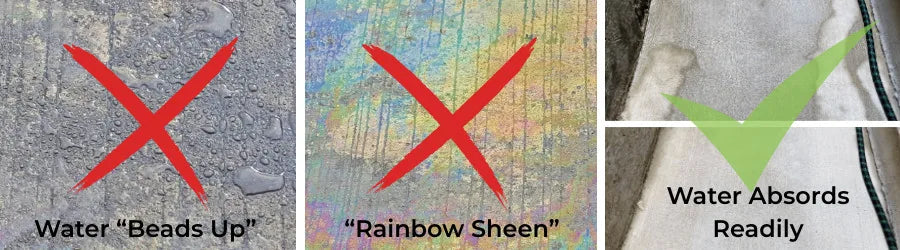
The three results of the water test: beads up, rainbow sheen, or absorbs readily.
Water beads up and will not soak in
The concrete is too smooth or still sealed. Stain cannot adhere to it, let alone react with it. You will need to sand the surface or chemically profile it with CitrusEtch™ before staining. This is the normal result on machine-troweled floors and on anything previously sealed.
A rainbow sheen appears
That is an oil spill. Clean the area with a concentrated mix of ProClean Degreaser™ and warm water. Heavy spills need more thorough work than one pass — see the oil section below, because oil that has soaked in is the hardest contaminant on this page to get rid of.
Water absorbs readily
Good — the slab has adequate porosity for staining. It still needs cleaning with a diluted solution of concrete cleaner and water, but you can skip etching.
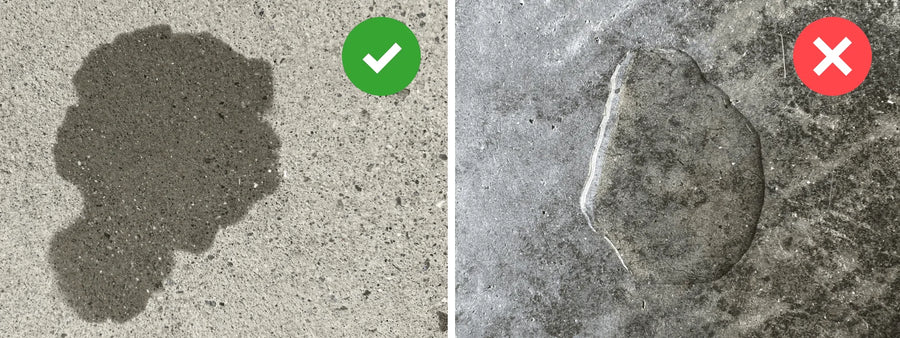
Left, water soaking straight in — ready to stain. Right, water sitting on a dense surface — needs profiling first.
Step 2: clean it, and clean it with the right thing
With that established, the cleaning itself is straightforward.
- Apply cleaner and degreaser. An organic degreaser like ProClean Degreaser™, diluted with water.
- Scrub gently. A soft nylon bristle brush, or a power washer on a low setting. You are lifting dirt and grease, not resurfacing the slab — aggressive washing changes the texture and the porosity you just finished measuring.
- Rinse thoroughly, until every trace of degreaser and loosened debris is gone.
- Remove the water with a shop vacuum, mop or squeegee, and let the surface dry completely. Residual moisture ruins stain absorption.
For routine cleaning between projects, or on a floor that is already finished, use ProClean Daily™ Neutral Cleaner instead — it is pH neutral and will not touch a sealer.
Etch or grind? Decide this before you buy anything
These two get discussed as though they were the same job at two different intensities. They are not the same job at all. Etching opens pores that already exist. Grinding removes the top layer of concrete and creates new ones. Hold those apart and most preparation questions answer themselves.
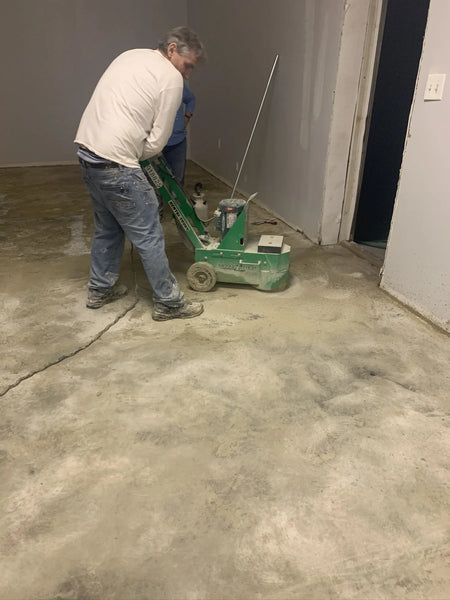
Etching is chemical. It costs very little, needs nothing beyond an all-plastic pump-up sprayer, and leaves the floor looking like the same floor. Grinding is mechanical. It needs a rented machine and dust control, it is a great deal more work, and it changes how the floor looks — it opens up sand and aggregate that were never visible before. On a decorative job that last point makes grinding a design decision as much as a preparation one.
The short version: etching fixes a surface that is closed. Grinding fixes a surface that is contaminated or damaged. An etcher cannot remove anything sitting in the pores, because it never reaches the concrete underneath.
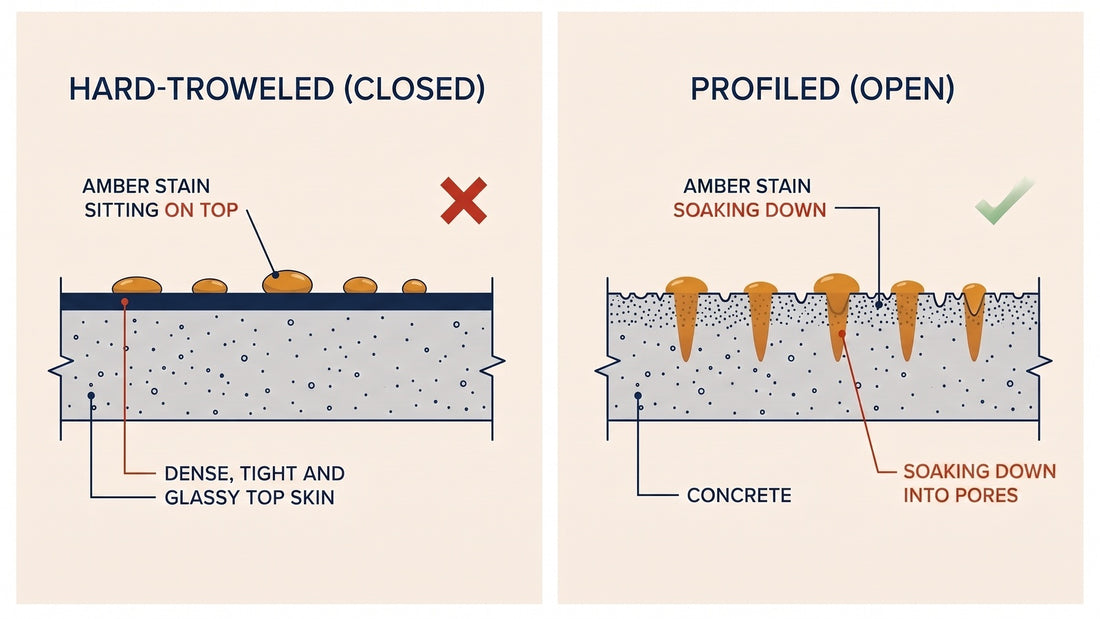
The whole problem in one picture. Left, a hard-troweled slab — the color has nowhere to go and sits on a dense, glassy skin. Right, the same stain on a profiled slab, soaking into pores that were opened first.
| The slab in front of you | What it needs | Why |
|---|---|---|
| Machine-troweled and clean — water beads up | Etch | The pores are closed, not blocked. CitrusEtch™ opens them and there is nothing to remove |
| Any sealer or coating still on it | Strip first, then re-test | Etcher applied to a coating etches the coating. Nothing reaches the slab |
| Carpet mastic that has been hardening for decades | Grind | Old adhesive outlasts every chemical you can put on it |
| Paint driven down into the pores | Grind | Residue you cannot see still blocks color in exactly those spots |
| Oil that degreaser and absorbent clay did not clear | Grind | Oil that deep sits below the surface you would be etching |
| Footprints etched into the floor | Scrub first, grind only if that fails | Start with a floor scrubber — it cleared one customer’s etch marks in four passes. Grind only if scrubbing will not level them. Either way it is a weekend you did not plan, which is why spiked shoes are not optional |
| High spots, ridges, an uneven pour | Grind | Etching removes almost no material and cannot flatten anything |
| Water already soaks straight in | Neither | Clean it and stain it. Etching an already-open slab only over-opens it |
| You want aggregate showing | Grind, by choice | Nothing is wrong with the slab. This is a look, not a repair |
- Machine-troweled and clean — water beads up → Etch. The pores are closed, not blocked. CitrusEtch™ opens them and there is nothing to remove
- Any sealer or coating still on it → Strip first, then re-test. Etcher applied to a coating etches the coating. Nothing reaches the slab
- Carpet mastic that has been hardening for decades → Grind. Old adhesive outlasts every chemical you can put on it
- Paint driven down into the pores → Grind. Residue you cannot see still blocks color in exactly those spots
- Oil that degreaser and absorbent clay did not clear → Grind. Oil that deep sits below the surface you would be etching
- Footprints etched into the floor → Scrub first, grind only if that fails. Start with a floor scrubber — it cleared one customer’s etch marks in four passes. Grind only if scrubbing will not level them. Either way it is a weekend you did not plan, which is why spiked shoes are not optional
- High spots, ridges, an uneven pour → Grind. Etching removes almost no material and cannot flatten anything
- Water already soaks straight in → Neither. Clean it and stain it. Etching an already-open slab only over-opens it
- You want aggregate showing → Grind, by choice. Nothing is wrong with the slab. This is a look, not a repair
After grinding you clean — you do not usually etch
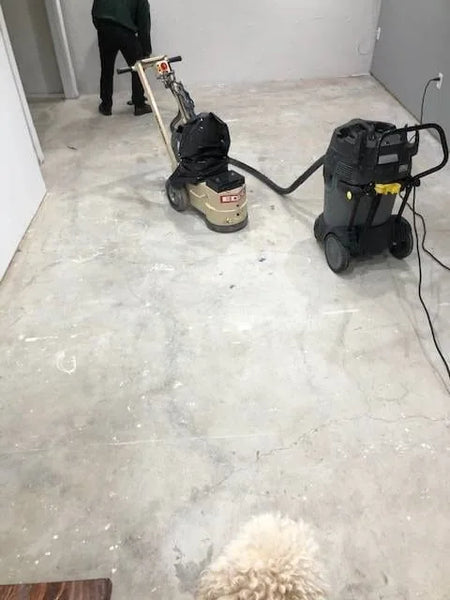
A freshly ground floor is fresh concrete. The closed surface is gone, so there is normally nothing left to open. What the floor is full of instead is dust, and dust is a bond breaker — see the next section, because this is the single most common way a properly prepared floor still fails. Once it is genuinely clean, run the water test. Even absorption means you are profiled and ready to go. If a patch still beads, that patch was not ground far enough — go back to it with the machine rather than reaching for the etcher.
Getting the grinding dust off — before stain, and again before sealer
Grinding dust betrays people twice. Once at the etch, where the solution reacts with the dust instead of the concrete underneath and locks the pattern permanently into the surface. And once at the sealer, where anything left on the slab gets sealed under the first coat and cures as a haze or a speckle you cannot get back out without stripping.
Note what they say: the floor was spotless. Ground dust is fine enough to sit invisibly in open pores on a slab that looks and feels clean, which is exactly why a quick pass with a shop vac is not enough. You are not sweeping a floor, you are emptying pores.
- Keep it down in the first place. Wet-grind if your machine allows it, or use a grinder with dust extraction. Every gram you never make is one you do not have to chase.
- Contain it before you clean. Tarp or sheet off the dirty areas — a doorway, a bathroom, the room you staged tools in — so nothing gets tracked back across the slab you just finished cleaning.
- Deep broom first, with a stiff broom. This is the step people skip. A vacuum lifts what is sitting on top; a stiff broom is what dislodges dust out of the open pores so the vacuum can reach it.
- Then vacuum thoroughly — a HEPA vacuum if you have one.
- Repeat the broom-and-vacuum cycle until nothing more comes up. Not once. Until it is clean.
- Wash it, and expect more than one wash. One commercial floor in our galleries needed three before the dust stopped appearing.
- Do the recesses separately. Tack holes, control joints, saw cuts and edges hold dust the broom cannot reach. Hold a thin vacuum attachment over each one for three to four seconds. Nothing bonds to dust — not stain, not sealer, not patching compound.
- Then run the water test again, across the whole floor. A slab that will not take water is still telling you something is in the way.
Before the sealer goes on, treat it as a fresh problem rather than assuming the job you did before staining still holds. If the slab has been walked on, has collected construction dust, or has sat unsealed for more than a few days, go back through the broom-and-vacuum cycle and finish with a damp microfiber wipe. The full pre-seal routine, including what each sealer needs, is in How to Apply Concrete Sealer.
What we will not guess at for you
We are not going to specify your grit or your machine, and we would rather say so than print a number we cannot stand behind. Grit and pad selection depend on the machine, on how hard your slab is, and on how much material you are actually trying to remove — and erring aggressive costs far more than erring gentle, because you cannot put concrete back. Tell the rental counter two things: what you are removing (mastic, paint, a sealer, a high spot) and what finish you want to be left with. Let them specify it, and take the finer option if you are unsure.
Step 3: etching a machine-troweled floor
Machine-troweled floors are smooth and dense by design, which is exactly the problem: stain cannot penetrate them. Etching chemically roughens the surface so it will absorb. This is the step most people either skip or rush, and both produce a floor you have to grind to fix.
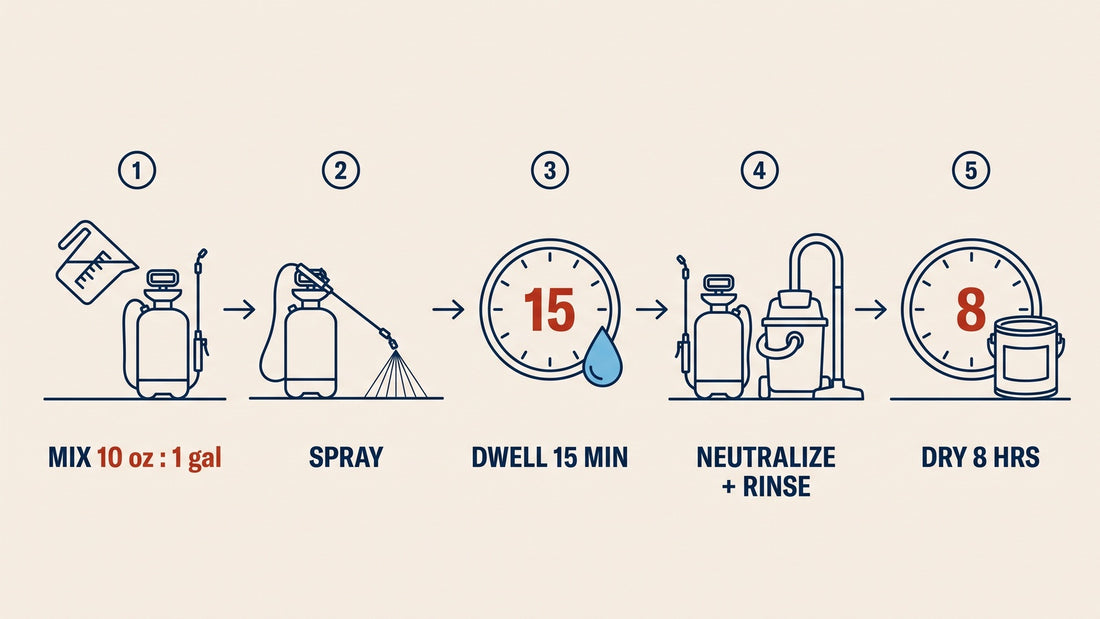
The same figures as a sequence. The eight hours on the last step is the label minimum — on a floor you are about to stain, give it 24 to 48.
Why spiked shoes matter more here than anywhere else
The etching solution chemically alters whatever it touches. Walk on a wet etched floor in ordinary shoes and you compress the surface under your feet; those compressed areas etch to a different depth than the rest of the slab, and when it dries you have footprints permanently in the floor. They do not wash off. Getting them out is a two-step escalation: try a rented floor scrubber first, which is how one customer removed etch marks from a 1,400 sq ft basement — four passes, eight hours — and only reach for a grinder if scrubbing will not level them. Sanding works too, slowly and messily. None of it is a pleasant weekend. A pair of spiked shoes keeps your sole above the surface so you can walk freely — or the slip-on CreteClogs™ if you would rather not deal with straps. We have written up two real projects where this went wrong, including one that took eight hours with a rented floor scrubber to undo.

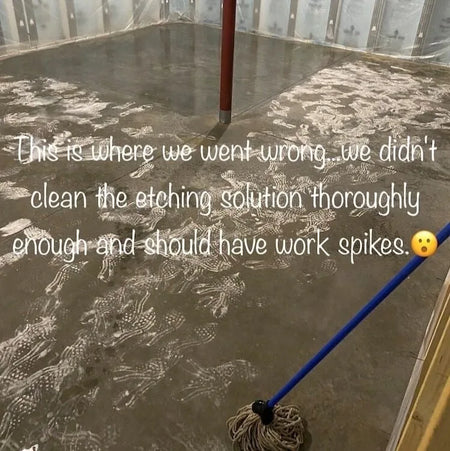
Neutralizing, and why the baking soda trick is a false economy
A baking soda solution does neutralize the acid effectively. The catch is cleanup: the reaction between baking soda and etching solution produces a lot of residue, and every bit of it has to be vacuumed or rinsed away or it will interfere with the stain. On a large floor that is a real job. ProClean Neutralizer™ does the same work with minimal cleanup. Either way, rinse thoroughly afterwards to remove the neutralizing agent itself.
The texture check: how to know the etch actually worked
Once you have neutralized, rinsed and let it dry, test it two ways — by hand and with water. A properly etched floor feels slightly rough, like very fine sandpaper, and takes water in within three to five minutes. There are three ways it comes back wrong, and all three mean the same thing:
- It still feels smooth. The etch did not open the surface.
- Water is still sitting there after five minutes. The same finding, measured rather than felt.
- It feels rough, but the roughness is a powdery film. That is residue, not profile — and residue is worse than a closed surface, because it will release later and take your stain or sealer with it.
In each case you etch, neutralize and rinse again. There is no fixed number of passes. The right number is whatever it takes to pass this check, which is exactly why the pre-test on a small area is worth twenty minutes: it shows you what one pass does on your slab before you have committed the whole floor. Etch only the areas that failed, and stop when they pass — over-etching is its own problem, and the goal is uniform absorption, not maximum roughness.
Shop CitrusEtch™ & Neutralizer →
Step 4: removing an old sealer
You cannot stain through a sealer, and you cannot remove one properly until you know which kind you are dealing with. There is a thirty-second test for that.
The xylene test
Pour a small amount of xylene onto the concrete somewhere inconspicuous. Wait about 30 seconds, then touch the spot. If it feels tacky, the sealer is solvent based — xylene softens solvent-based sealers, and that tackiness is the sealer responding. If nothing changes, it is water based. Water-based sealers do not react with xylene at all.
Removing a solvent-based sealer
Xylene is also the removal method, but it needs time in contact with the surface. Lay a cotton sheet or towel over the area, soak it generously with xylene until it is fully saturated, and leave it overnight. The next day, pull the sheet off — the sealer will have lifted or gone pliable enough to remove. Multiple layers of sealer may need more than one round of this.
Removing a water-based sealer
Water-based sealers need a stripper. Destiny™ Stripper is our non-caustic coating remover — no caustics, mild odor, and a controlled-viscosity formula with more body than a standard liquid stripper, so it stays in contact with the coating instead of running off it. It works on sealers, paints, acrylic stains, varnishes and failed coatings, including multi-layer buildup.
Work in sections you can finish, using walls, expansion joints or control lines as natural breaks, so nothing dries before you have removed it. Collect the slurry with a wet-dry vacuum rather than flushing it away, and keep all of it out of pools, fountains and drains. If you are working near a pool, shut the pump off until the job is finished.
What comes after stripping, in order
Getting the coating off is not the finish line, and the sequence that follows is where stripping jobs get lost.
- Clean with ProClean Degreaser™, diluted per its own label, to take off stripper residue.
- Re-run the water test. A stripped slab is not automatically an open one — the coating may have been sitting on a hard-troweled surface the whole time.
- Etch only if it still beads. CitrusEtch™, then ProClean Neutralizer™.
- Dry completely before any stain, sealer or coating goes down.
Step 5: removing paint
Paint is the hardest case on this page, and the reason is porosity. Concrete is porous; once paint has gone into the pores, getting all of it out is very difficult, and what stays behind will block the acid stain reaction in exactly those spots. Understand that before you start, because it changes what product you should plan to finish with.
- Clear the loose material with a shop vacuum or broom before any chemical goes down.
- Apply a gel paint stripper — a soy- or citrus-based gel is effective and much kinder to work around than traditional strippers. Coat the painted surface evenly, about 1/16 to 1/8 in. thick, covering everything.
- Let it work for 30 to 60 minutes, adjusting for the paint and stripper you are using.
- Remove the softened paint by scraping. On a large area or with stubborn paint, an industrial wet vacuum is far faster than scraping alone.
- Degrease and rinse. ProClean Degreaser™ and water to scrub off stripper residue and remaining paint, then a thorough rinse.
For floor coatings rather than ordinary paint — acrylic, urethane, epoxy, multi-layer buildup — Destiny™ Stripper is the product to reach for.
What to do when residue survives anyway
Two honest options, and it is worth being straight about how far each one gets you.
Change the surface. Grinding removes the top layer of concrete along with the paint embedded in it and leaves a fresh, porous layer that stains beautifully. On a badly painted floor this is the answer rather than the fallback — and a ground floor always needs a thorough clean afterwards.
Change the product, knowing what that does and does not solve. Acid stain has two dependencies: it has to get into the pores and react with the lime in the concrete. A colorant that deposits color instead of reacting drops the second one — ColorWave® and Vibrance™ Dye both do — which makes them more forgiving on a slab whose chemistry has been compromised. Neither is better than acid stain; they are different tools for a different problem. But they still have to get into the pores, and Vibrance™ in particular tends to highlight differences in porosity rather than hide them. So on a slab with residue still in the pores, changing product improves your odds — it does not remove the problem. If the residue is patchy and you can see it, grind.
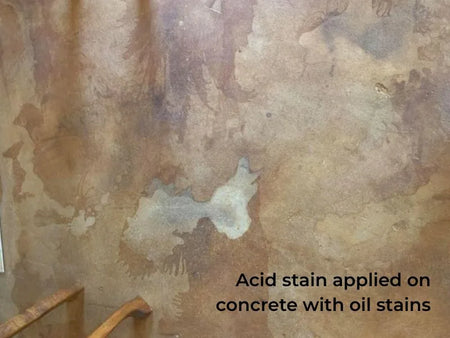
An acid-stained floor with pale unstained patches where oil had soaked in — the same thing happens over paint residue.
Step 6: removing carpet glue
Mastic behaves differently depending on its age, and matching the method to the age saves an enormous amount of wasted effort.
- Assess it first. Fresh adhesive comes up far more easily than glue that has been hardening for decades. Knowing which you have decides everything below.
- Scrape, for newer glue. A floor scraper or putty knife may be enough on lighter adhesive.
- Chemical adhesive remover made for carpet glue and compatible with concrete, per its own instructions, to dissolve the glue enough to scrape.
- Heat, sparingly. A heat gun softens stubborn glue, but too much heat damages the concrete. Use it carefully.
- Power washing can help outdoors or in a well-ventilated space, especially after a chemical remover.
- Grinding. With very old, hardened mastic, skip the four steps above and go straight to machine grinding. It needs equipment and it is more work, but it is the only method that reliably removes the toughest adhesive, and it beats a week of fighting with chemicals that were never going to win.
- Final clean with concrete cleaner and water to take off residual adhesive and preparation products.
This is what glue residue does to an acid-stained floor. The pale areas are not a staining mistake — they are places where adhesive was still on the slab and the stain could not reach the concrete to react with it.
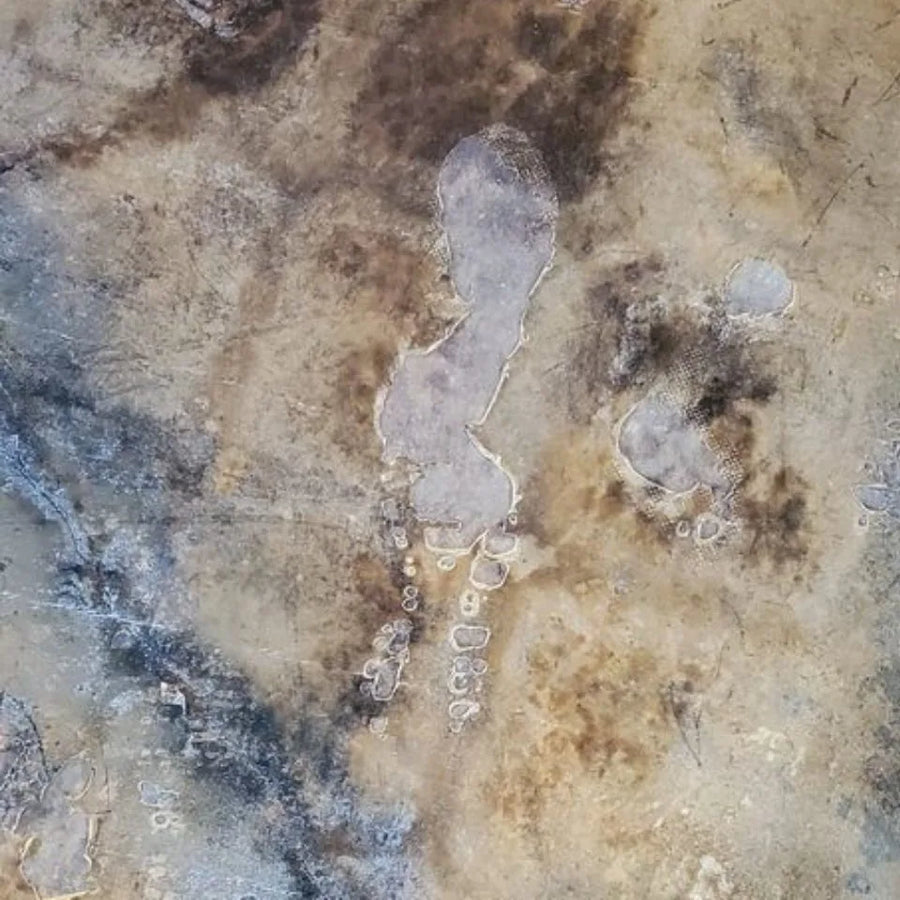
Pale unstained patches on a finished floor where carpet glue residue blocked the acid stain.
Step 7: removing oil stains
Oil is the contaminant most likely to be missed, because a dry slab can look clean and still be saturated. The water test finds it: beading, or a rainbow sheen.
- Identify the extent. Spray water and look for beading or a rainbow sheen.
- Degrease and scrub. Mix ProClean Degreaser™ per instructions, apply generously over the stained areas, and scrub with a stiff brush to break down and lift the oil.
- Draw the rest out. If the stain persists, sprinkle an oil-absorbent clay generously over it, then apply a solvent such as xylene over the absorbent. The combination pulls oil back out of the pores.
- Repeat. Stubborn stains rarely give up on the first attempt. Where oil has gone deep or the stain is old, sanding or grinding may be the only complete answer.
- Final clean and rinse, then let it dry completely before any stain or sealer.
- Prevent the next one. A concrete sealer makes future spills far easier to clean up.
Before you open a single bottle of stain
Run the water test one more time, across the whole floor rather than in one spot. Uniform absorption is the only thing that produces uniform color. If part of the slab still beads, that part will stain differently, and you will see it forever. And test the color itself while you are there — an acid stain trial kit on your own prepared concrete tells you what the color will actually do, which no swatch can.
Shop the Full Surface Prep Line →
Common questions
What does it mean to profile concrete before acid staining?
Changing the surface texture so the stain can penetrate. You can do it chemically, with an etcher approved for acid stain such as CitrusEtch™, which opens the pores without interfering with the reaction later. Or mechanically, with a sander or grinder — the right call on very smooth slabs, or floors carrying glue, paint and drywall mud, where a chemical strip would cost more than renting the machine.
Can I use a hardware-store etcher or muriatic acid before acid staining?
No, and this one is not recoverable. Etchers meant for paint, epoxy, sealers or water-based stains dissolve the surface minerals that acid stain needs to react with. Without them the stain just sits on top and washes away during cleaning. A slab previously cleaned with muriatic acid and water will either not stain at all or stain very unpredictably. If the etcher is not specifically for acid stain, do not use it.
How do I know whether my floor needs etching?
Do the water test. Put water on the slab and watch: if it soaks in readily you are probably fine, and if it beads on top the surface needs etching first. Most indoor concrete was machine troweled, and basement and garage floors are usually the smoothest in the house — they will more often than not need etching before staining.
My slab has already been acid-washed. Is there any way to get a stained look?
Yes, just not with acid stain. Indoors, EasyTint™ on its own, or EasyTint™ combined with Vibrance™, will give you the color variation and movement that reads like an acid stain finish. Outdoors, Antiquing™ with EasySeal™ Satin does the same job. If you are unsure whether the slab is still stainable, test it with a sample bottle first.
Listen to this episode
Direct Colors DIY Home Improvement · Episode 21
Prepping Concrete for Acid Staining
Amie Nolen and Shawna Turner · 5 min 06 sec · read the full transcript
What’s Next
- Etching mistakes, and how two customers fixed them → Concrete Etching Gone Wrong
- A 30-year-old damaged slab, restored → Acid Staining Old and Damaged Concrete
- Fill the holes the carpet left → Repair Tack Strip Holes in Concrete
- Then stain it → How to Apply Acid Stain · How to Neutralize Acid Stain
- Staining over an existing stain → Staining Over Stained Concrete
- Shop → Surface Preparation · Tools & Supplies · Trial Kits


