FREE Shipping on Orders Over $499| USE CODE: SPRING for 15% Off sitewide through March 31.
Product Search

Your Shopping Cart Is Empty
facebook
twitter
pinterest
linkedin
Staining concrete fountain

Sealing Concrete Fountains And Birdbaths

Phillip Cooper: Today, our discussion centers on the coloring and sealing of concrete water fountains and bird baths. So, let’s dive right in.

PC: We receive numerous inquiries from our DIY concrete décor customers. Just last week, a woman asked us about the best way to color her concrete water fountain. Shawna, could you provide some insights on this?

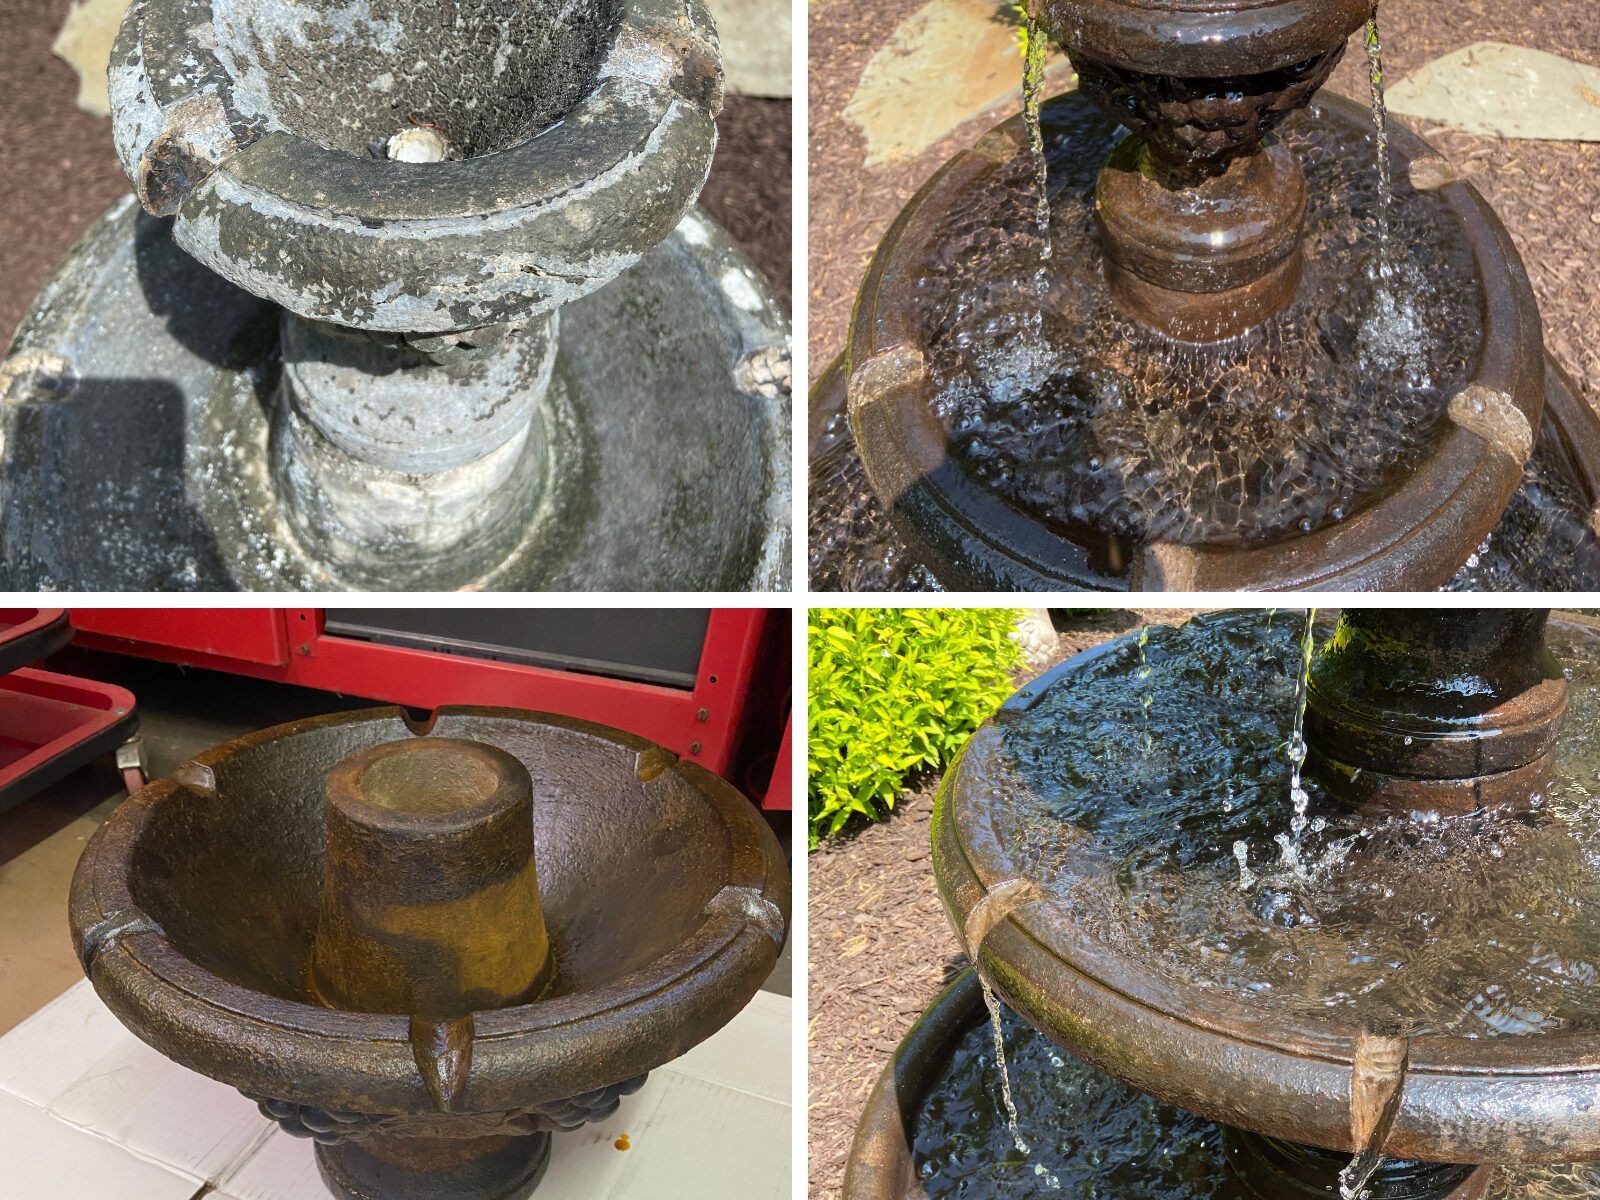
Shawna Turner: Water fountains are indeed a popular project. I often hear from customers looking to enhance concrete bird baths and water fountains purchased from their local hardware stores. However, these items require special care due to the constant flow of water over them. It’s necessary to choose a colorant that can penetrate the concrete pores, color it, and then be sealed to protect it from the elements.

A picturesque bird bath stained with Shifting Sand acid stains for the base and Azure Blue accents highlighting its artistic features. The bird bath is structured like a bowl, with a large, intricately designed concrete leaf mounted on top, providing an inviting spot for the birds.
This stunning bird bath, artfully stained with Shifting Sand DecoGel acid stains and accented with Azure Blue, showcases a large concrete leaf on top - a perfect perch for feathered visitors.

When handling such projects, I usually opt for our EverStain™ acid stain or our DecoGel™ Acid Stain. The latter is a gelled acid stain that’s particularly effective for vertical surfaces. I’ll elaborate more on that shortly.

We offer ten different acid stain colors that can be sprayed on or applied with a foam brush with ease. But remember, while spraying the acid stain onto a bird bath or similar surfaces, it’s important to avoid drips that could result in unsightly lines on your project. If drips do occur while using the liquid acid stain, make sure to address them promptly.

A tastefully stained bird bath showing the successful blending of two EverStain colors. The uneven surface and numerous crevices and divots of the bird bath are evident, demonstrating the intricate nature of the project
A fine example of the power of patience and skill, this bird bath reveals my first-time use of EverStain. I aimed for a natural look by blending two colors. I learned the importance of avoiding heavy lines while spraying and the value of swift, in-motion sprays. Having a sponge brush at hand proved essential to manage runs on this uneven surface, full of crevices and divots. Swift blotting helped prevent any unwanted markings, ensuring a beautiful result.

In addition to that, we have DecoGel™, a gelled acid stain available in nine colors. Its oil paint-like consistency makes it excellent for getting into the crevices of a concrete project, providing darker accents, or creating a multi-colored design. For example, I worked on a concrete planter with leaves and grape designs on the surface. I used one DecoGel™ color for the leaves and another for the grapes. The outcome was impressive, but it’s critical to apply and remove the product carefully to maintain the color distinctions.

An intricate concrete planter adorned with leaf and grape designs, beautifully stained with distinct DecoGel™ colors. Seagrass, Desert Amber, Cola, and Shifting Sand hues are cleverly used to emphasize the details, presenting a rich color palette that enhances the concrete's texture and design.
Showcasing my creative journey with DecoGel™ Acid Stain, this concrete planter represents meticulous work and attention to detail. Leaves and grape designs come alive with the use of Seagrass, Desert Amber, Cola, and Shifting Sand DecoGel™ colors, demonstrating the impressive results of careful application and removal.

PC: We understand that choosing a sealer for a water fountain or bird bath can be challenging, particularly since the concrete is frequently submerged in water. What would you recommend as the best option?

ST: I typically suggest our Penetrating Lithium Hardener/Sealer, available on our website. It’s particularly suitable for the basin part of bird baths and any part of water fountains. The main advantage is that this sealer is penetrating, meaning it doesn’t leave anything on the surface. Instead, it penetrates the concrete pores.

You might wonder why it matters. Wouldn’t a surface sealant work just fine? While surface sealers are great for floors, driveways, or patios, they’re less suitable for submerged concrete. Over time, water can get under the surface sealer, causing discoloration and even detachment from the concrete. You want to avoid this.

A weathered, three-tier fountain in desperate need of restoration. The impact of harsh Ohio winters and sun fading is evident on the faded concrete structure
Our once vibrant three-tier fountain showing signs of severe weathering despite protection during the harsh Ohio winters

The Lithium Penetrating Sealer, however, seals from within the concrete pores, preventing water from penetrating and damaging your piece. Additionally, it has several other benefits. For instance, it strengthens the concrete, making it more resistant to potential weather damage during winter months. So, freeze-thaw cycles will no longer cause your concrete to deteriorate.

Restoration process of a three-tier fountain, showcasing the application of Coffee Brown EverStain Acid Stain using a paint brush
Patience is key! Here, we apply the Coffee Brown EverStain Acid Stain with a paint brush, taking care not to rush the process for an optimal outcome.

One more advantage is that this sealer only requires a single application. You’re not expected to reapply it every other year. Just one application seals your piece for its entire lifespan. It also has a good coverage area. For an average water fountain, you’d only need a quart of sealer, which is quite an affordable investment. However, do note that this sealer leaves a matte finish. When the water is turned off, it might appear somewhat dull when dry. So, consider this factor when making your decision.

A beautifully restored three-tier fountain, with rich Coffee Brown color from EverStain Acid Stain and a protective layer of Penetrating Sealer, Hardener & Densifier.
Our restored fountain, radiating a fresh lease of life with the Coffee Brown EverStain Acid Stain and Penetrating Sealer, Hardener & Densifier.

PC: That’s great and I’m sure these suggestions will be a big help to people with planned fountain and birdbath projects.

If you have questions, call one of our expert technicians at 877-255-2656 and we’ll help you select the best products and technique for your needs.  If you prefer email, send in a free online design consultation and we’ll get back to you within 24-48 hours. DIY Home Improvement podcasts are produced twice monthly for your enjoyment and show notes can be found at at directcolors.com/listen.   Thanks again for joining us!

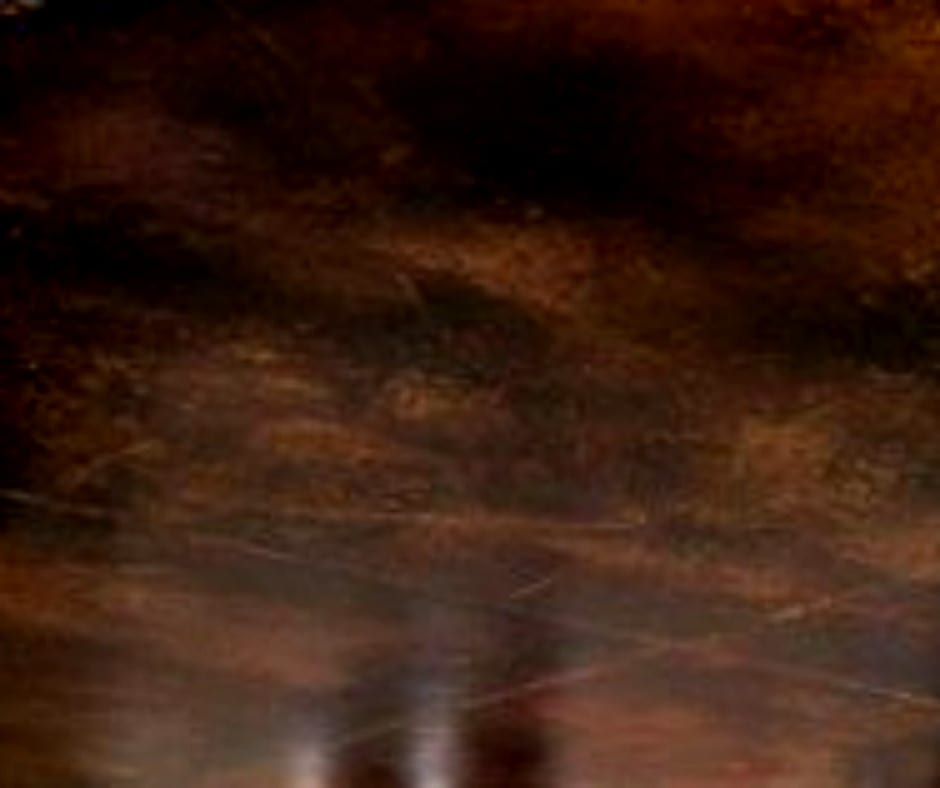
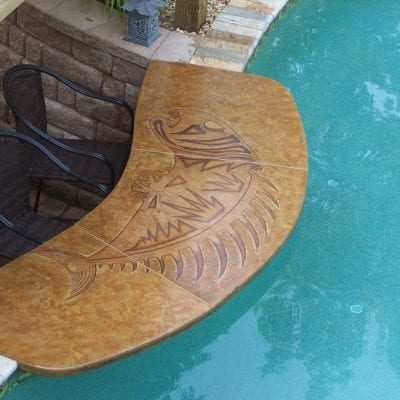
Creating a Durable and Attractive Concrete Fountain with DecoGel Stain

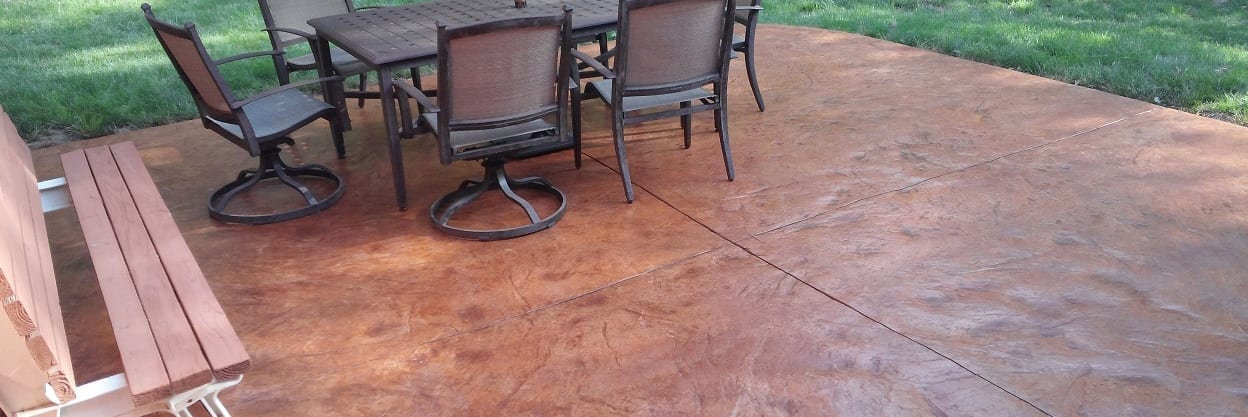
This project showcases the process of constructing a concrete fountain using CSA/Rapidset concrete and a melamine form. A copper pipe was utilized for the water feature, and Direct Colors’ DecoGel was applied for staining. Opting for the rich Coffee Brown shade allowed for a darker hue than what the mix naturally offered, adding an appealing contrast. Application tips include the use of a smooth roller for an even finish and testing on the fountain’s back for color preference.

Creating the cast for a concrete fountain using melamine and copper piping
Forming the foundation: Building the cast for our concrete fountain using melamine and copper piping to incorporate the water feature.
A photo of the freshly-cast concrete fountain, pre-staining, revealing the natural color of the CSA/Rapidset mix
The birth of our fountain: A freshly-cast, ready-for-staining concrete fountain, showcasing the raw beauty of the CSA/Rapidset mix.
The concrete fountain immediately after the application of the Coffee Brown DecoGel stain.
Transformation in progress: The concrete fountain begins to display its new character, soon after the application of our chosen Coffee Brown DecoGel stain.
A completed concrete fountain, beautifully stained in Coffee Brown and sealed with Penetrating sealer
Our labor of love: The finished concrete fountain, glowing in the rich Coffee Brown DecoGel stain and protected by Penetrating Sealer, Hardener & Densifier. A true testimony to careful planning and meticulous execution.

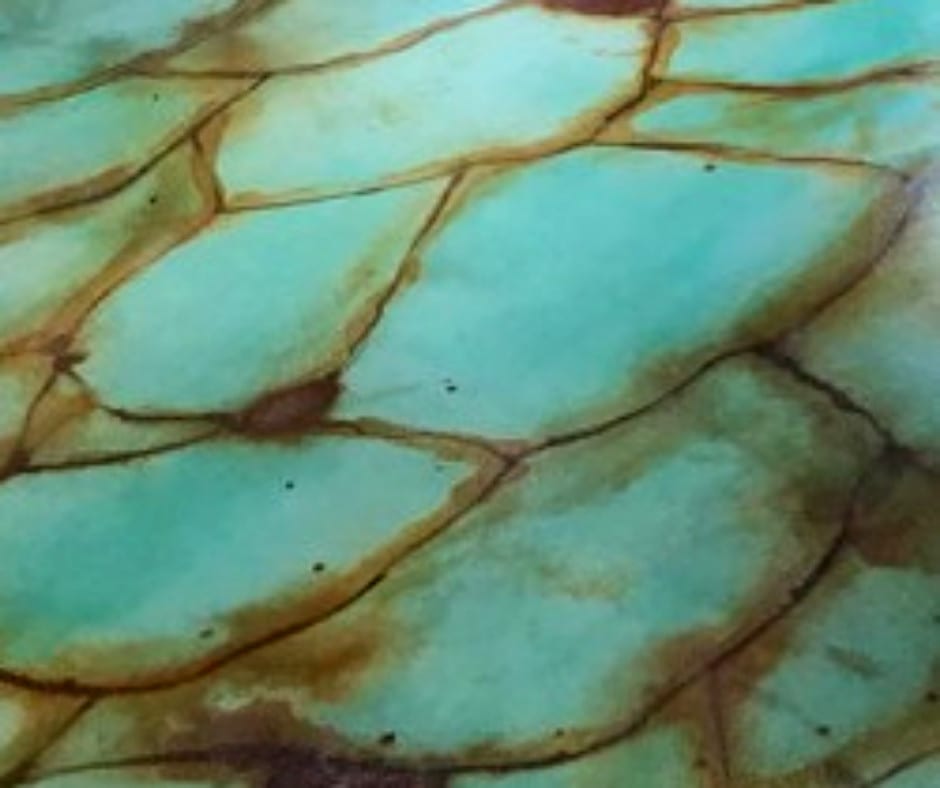
Vibrant Patio Succulent Fountain: A Concrete Staining Journey

This project involved the transformation of a bare concrete succulent “fountain” on a patio using a colorful trio of Azure Blue, Desert Amber, and English Red stains. The result is a vibrantly colored centerpiece that brings life to the outdoor space. The outcome far exceeded expectations, demonstrating the transformative power of quality staining techniques.

A photo of a bare concrete succulent "fountain" on a patio, before staining
The blank canvas of our project, a bare concrete succulent "fountain" awaiting its colorful transformation
A photo of the succulent "fountain" on the patio, vibrantly stained in Azure Blue, Desert Amber, and English Red
The succulent "fountain" post-staining, radiating in the rich hues of Azure Blue, Desert Amber, and English Red, and completely elevating the patio ambience. The project outcome is beyond thrilling, showcasing the incredible transformation brought by thoughtful staining.
facebook
twitter
pinterest
linkedin
Winterize Outdoor Concrete

Podcast: Winterizing Outdoor Concrete

You’re listening to podcast episode 5: Winterizing Outdoor Concrete.  In this podcast, Direct Colors offers tips and recommendations on getting your outdoor concrete, countertops and concrete decor ready for the cold weather season. Time to winterize your outdoor concrete! If this is your first time listening, then thanks for listening and welcome to DirectColors.com/Listen!

Continue reading “Podcast: Winterizing Outdoor Concrete”

facebook
twitter
pinterest
linkedin
Coffee Brown Concrete Acid Stain Color

Podcast: Converting Patios into Indoor Living Space

You’re listening to Direct Colors podcast Episode 8: Tips on Converting Patios into Indoor Living Space! If this is your first time listening, then thanks for joining us. Many homeowners would like to convert their existing outdoor slabs into sun-rooms and enclosed patios but there are a few things to keep in mind about the concrete once the outdoor becomes indoor living space. Shawna Turner, General Manager at Direct Colors, is here with us today to talk more about patio conversions and what to look out for.

Continue reading “Podcast: Converting Patios into Indoor Living Space”

facebook
twitter
pinterest
linkedin
Blue and Green Acid Stain

Podcast: Guidelines for Using Blue and Green Acid Stain on Outdoor Projects

You’re listening to Direct Colors podcast Episode 3: Guidelines for Using Blue and Green Acid Stain on Outdoor Projects. Join us as we chat with Direct Colors General Manager, Shawna Turner, about guidelines for using blue and green concrete acid stains on outdoor projects.

Continue reading “Podcast: Guidelines for Using Blue and Green Acid Stain”

facebook
twitter
pinterest
linkedin
Acid Stain Floors During Construction

Acid Staining Floors During Construction

You’re listening to DIRECTCOLORS.COM/LISTEN podcast episode number 24. If this is your first time listening, then thanks for coming. I’m Tommy Carter and today we’re talking about acid staining floors during the construction. As acid stained floors have become more popular, homeowners need to know when to acid stain and what to do to protect the finish throughout the construction process. Shawna Turner, General Manager, with Direct Colors is here to give us the scoop on new construction staining projects. Welcome, Shawna.

ST: Thank you very much

Tommy C: What’s the first thing to keep in mind when acid staining floors in a new construction home?

ST:  Probably the first thing is to make sure your General Contractor knows and understands that you plan to acid stain the floors. If he or she knows in advance, they can properly direct the ready-mix company pouring and finishing the concrete as well as other building contractors to act accordingly.

Tommy C: What role does the pouring and finishing of the concrete play in successfully acid staining?

ST: If you plan to acid stain concrete, the mix should contain no more than 10% fly ash and should only be lightly machine troweled if at all. The concrete should be rich in cement content and the pores open for the stain to readily absorb and react. As long as the GC knows in advance, these requests should not be difficult or costly to implement.

Tommy C: When should a homeowner plan to acid stain their concrete during construction?

ST: The concrete should be allowed to cure for 30 days for best staining results. If at all possible, the concrete should be stained after the dry wall has been hung but BEFORE it has been mudded in. The reason this is so important is that dry wall mud is a very challenging contaminant to remove from concrete after the fact. Homeowners wishing to acid stain their floors are then forced to spend a lot to time and money cleaning that could have been entirely avoided. Spray insulation is also a problem. Spray insulation should be installed AFTER the floors have been covered with overlapping cardboard. The chemicals interfere with the staining and sealing process and are notoriously difficult to remove.

Tommy C: Just to be clear, could you give us the step by step process from acid staining to waxing?

ST:  Sure. That’s a good idea. Once the dry wall has been hung, clean the floors thoroughly using a medium to heavy duty organic degreaser and water solution. All debris, particularly chalk lines, paint, oil stains, dirt and the like, has to be off the surface and out of the pores before you begin. Sanding may be necessary for stubborn debris and staining. When the floors are clean and dry, apply the stain, neutralize and clean according to the instructions. Leave the floor to dry. At this point, you really only want to apply one coat of sealer. I recommend our Sprayable Satin Finish Sealer, especially if you’re working in the winter months. It does have a strong odor during application but can be sprayed on floors freezing and above.

Tommy C: Why just one coat of sealer at this stage?

ST: Even when you cover the floors with overlapping cardboard, damage can still be done during construction. Once the work is complete and the floor cleaned, another coat of sealer can be applied to repair any existing damage and make the floor look brand new again. The sprayable satin finish or AC1315 High Gloss are both solvent-based and have the ability to re-emulsify the acrylic for a smooth final coat.

Tommy C: So what are the final steps after applying the sealer?

ST: After the sealer has been successfully applied, allow the concrete to dry for at least 10 hours before covering with overlapping cardboard. DO NOT TAPE THE CARDBOARD TO THE FLOOR. Tape will bond with the sealer and ruin the finish. Keep the floor covered until construction is complete and the baseboards are ready for placement. At this point, you’re ready to remove the cardboard, clean the floor and apply your final coat of concrete sealer. Allow for 24-48 hours ventilation and dry time before applying the concrete wax and floor polish according to the instructions.

Next step: Enjoy your Floors!

Tommy C: Thank you, Shawna, for that detailed information about acid staining floors during construction. I know it’s a common planning question with our DIY customers. Check out our blog for more on the Care and Maintenance for Acid Stained Floors and other decorative concrete flooring projects.

Tommy C: directcolors.com/listen includes podcasts on many decorative concrete topics so visit our podcast library for past episodes and check back frequently to see what’s new in the world of DIY decorative concrete! Thank you for listening.

If you have questions, call one of our expert technicians at 877-255-2656 and we’ll help you select the best products and technique for your needs.  If you prefer email, send in a free online design consultation and we’ll get back to you within 24-48 hours. Direct Colors DIY Home Improvement podcasts are produced twice monthly for your enjoyment and show notes can be found at directcolors.com/listen.  Feel free to add the podcast to your favorite RSS feed.  You can also follow us on Twitter, Facebook, Google+ , YouTube and Instagram.  I’m Tommy Carter and thank you for joining us!

facebook
twitter
pinterest
linkedin
Calculating Pigment for Grout

Calculating Pigment for Grout, Stucco, Mortar and Plaster

You’re listening to Direct Colors podcast Episode 19: Calculating Pigment for Coloring Grout, Stucco, Mortar and Plaster. If this is your first time listening, then thanks for joining us.  Many of our customers are interested in coloring grout, stucco, plaster and mortar but have a difficult time finding the right colors, especially blues, and small enough quantities. Direct Colors General Manager, Shawna Turner, is here to talk more about calculating for and mixing custom colors in these materials. Welcome Shawna.

Amie Nolen: Calculating pigment for so many different cement-based mixes sounds complicated. Is it?

Shawna Turner:  It definitely can be. The difficult part is the fact that very few manufacturers report the product contents on the side of the bag. Usually the technical data sheet will include the amount of cement in the mix but that’ s not always available so we often are forced to make an educated guess that many vary somewhat from product to product.

AN: Why is the amount of cement in the mix so important for getting the color right?

ST: Concrete pigment creates color by coating the cement particles with color so other ingredients are a less important part of the color equation. The pigment needed to achieve a specific color from our color charts is based on the amount of cement only rather than the total weight of the mix. Each mix is comprised of a 3:1 ratio of sand to cement and/or lime. If lime is also added to the mix, the cement and lime should be added together for the purposes of calculating pigment load. Whether you are mixing your own material or using a pre-bagged concrete ready mix, having this basic information can help you to determine how much pigment you need for a project. Because grout, stucco, plaster and mortar are cement, sand and possibly lime mixes containing no aggregate, colors can appear somewhat different in fact than they are on color charts. Testing is incredibly important when working with these materials and will help avoid mistakes.

AN:  There are several concrete calculators on the website. Which calculator should a customer use for these mixes as opposed to concrete?

ST: The calculator most useful for coloring grout, stucco, mortar and plaster is called the Custom Batch Calculator. The Custom Batch Calculator requires two pieces of information – the weight of cement and/or lime in your mix and the pound rating for the color chosen from our concrete pigment color chart. We recommend calculating both for batch size as well as the overall project. For example, if you planned to use one 80lb. bag of stucco mix and wanted to integrally color the stucco to Cornflower. You’d enter 20 lbs. for the cement/lime content and a “1” for the pound rating to calculate the amount of pigment needed for the project which is just under a quarter of a pound (.21 lbs.) per bag.

If you’re calculating for a sample, the pound output from the calculator is likely to be unhelpful so we’ve provided a link to other calculation options at the bottom of the page. For example, say you have about 5 lbs. of cement/lime in your mix and the amount of pigment needed for the chosen color, Royal Blue, is 0.1595 lbs. 0.1595 lbs. is a difficult number to work with so converting lbs. to teaspoons for such a small batch is very useful. Using a conversion website easily found with a search engine, we’ll need 15 teaspoons to achieve Royal Blue in 5 lbs. of white Portland mix. Calculating from lbs. to grams is also a good option. Gram scales provide more exact measurements, especially when measuring small amounts, and can be used for any small or medium sized project.

We also have a step-by-step video describing how to use the concrete pigment calculators that our customers have found very helpful in determining how much pigment to order for an upcoming project.

AN:  What about sealing? Is it necessary in all instances?

ST:  Outdoor stucco applications should be sealed with an acrylic or penetrating densifier sealer to protect the color integrity from the elements. Some customers prefer a light shine and the easy application our Sprayable Satin Finish Sealer offers, especially for stucco projects. Our  DCI Penetrating Lithium Sealer Hardener has a matte finish is perfect for grout projects where gloss isn’t all that desirable. This sealer enhances overall concrete durability and is a one-time application which is super. Sealing for interior projects isn’t necessary but acrylic sealers will deepen color appearance and add some gloss.

AN:  Thanks for making pigment calculations for grout, stucco, mortar and plaster mixes easier to understand. If you have questions, call one of our expert technicians at 877-255-2656 and we’ll help you select the best products and technique for your needs.  If you prefer email, send in a free online design consultation and we’ll get back to you within 24-48 hours.

Direct Colors DIY Home Improvement podcasts are produced twice monthly for your enjoyment and show notes can be found at directcolors.com/listen.  Feel free to add the podcast to your favorite RSS feed.  You can also follow us on Twitter, Facebook, Google+ , YouTube and Instagram. Thanks again for joining us!

facebook
twitter
pinterest
linkedin
Prepping for Acid Stain

Podcast: Prepping Concrete for Acid Staining

You’re listening to Direct Colors podcast Episode 21: Prepping Concrete for Acid Staining. If this is your first time listening, then thanks for joining us.  Prepping concrete for acid staining before getting started is critical to success but how this is done can make or break a project. Here to discuss how to and how not to prepare concrete for acid staining is Shawna Turner, General Manager for Direct Colors.

Amie Nolen:

It seems like surface preparation is the most important step of the process. Can this be a big problem for customers if they don’t do it right?

Shawna Turner:  Absolutely.  Not all concrete can be acid stained but most can if the concrete is properly profiled using the correct product or method before staining. Determining which method or product is best can be the biggest challenge.

AN:

Could you explain what it means to profile the concrete?

ST:  Sure. Profiling the concrete simply means to change the surface texture to allow for better acid stain penetration. Profiling can be accomplished by either a chemical or mechanical means. Chemical profiling using an acid stain approved etcher such as our DCI Hard Trowel Floor Prep will open the pores without interfering with the later acid staining process. Mechanical profiling would involve a concrete sander or grinder which might be used on extremely smooth or heavily contaminated floors. For example, floors with glue, paint and drywall mud over most of the concrete should probably be mechanically profiled using a grinder because the cost of a chemical strip would be greater than the cost of renting the machine.

AN:

What products should not be used to profile concrete?

ST:  That’s a pretty easy question to answer. If the etcher is intended for use with anything other than acid stain, don’t use it. That would include water based stains, sealers, epoxy coats, paint and anything else not specifically called acid stain. Acid based cleaners and etchers used in conjunction with other coatings actually dissolve the minerals in the surface of the concrete necessary to support the reaction between an acid stain and the concrete. Without those minerals, the acid stain will sit on the surface and be washed away later in the cleaning process. So if you have previously cleaned your concrete using a muriatic acid and water solution, the slab will either not stain at all or stain very unpredictably depending on how the solution was originally applied and how strong it was. I really can’t emphasize enough that you’ve bought a concrete etching product from a local big box store, don’t use it if you want to acid stain later. Really that’s the bottom line.

AN:

Ok. That is straight to the point. How would a customer know aside from obvious surface contaminants that their concrete needs profiling in the first place?

ST:   Most indoor concrete and some outdoor poured in the last 10-15 years was likely finished using a machine trowel. We discuss this in some detail on the first page of our How to Guide for Applying Acid Stain. A simple water test will often reveal whether water will readily absorb into the concrete or bead on top. If beading does occur, the surface needs to etched using our DCI Hard Trowel Floor Prep before acid staining. Basement and garage floors are generally the smoothest floors in the house and will more likely than not require etching prior to staining.

So what happens next for customers that have used an acid based etching or cleaning product on their concrete?

ST: I would recommend either Tinted Concrete Sealer or a Tinted Concrete Sealer and DCI Concrete Dye combination to create more color variation and movement on the floor similar to an acid stain finish. If you’re working with outdoor concrete, I suggest our Liquid Colored Antique and Sprayable Satin Finish Sealer. We have a wide color selection and it is extremely easy to apply.

I’ve used this product at home on my walkways and patio and have been very happy with it. If you are in some doubt as to whether your concrete will stain or not, try an acid stain sample bottle and make sure. It’s always a good idea to test the quality of your concrete regardless and it never hurts to try. You’ll find acid stain samples and samples of all our products on our website.

AN: Thank you, Shawna, for setting us straight on prepping concrete for acid staining. No doubt this will help a number of homeowners avoid a costly DIY mistake. For more information on acid staining floors and outdoor concrete, visit Direct Colors Design Blog or Featured Projects pages.

If you have questions, call one of our expert technicians at 877-255-2656 and we’ll help you select the best products and technique for your needs.  If you prefer email, send in a free online design consultation and we’ll get back to you within 24-48 hours.

Direct Colors DIY Home Improvement podcasts are produced twice monthly for your enjoyment and show notes can be found at directcolors.com/listen.  Feel free to add the podcast to your favorite RSS feed.  You can also follow us on Twitter, Facebook, Google+ , YouTube and Instagram. Thanks again for joining us!

facebook
twitter
pinterest
linkedin
Outdoor Concrete Kitchen Pizza Oven

Podcast: Tips for Pouring Acid Stain Ready Concrete

Not all concrete is created equal. Increasingly, ready mix companies are including additives like fly ash in the concrete that can interfere with the acid staining process. With more and more people interested in pouring acid stain ready concrete, we’ve got a few tips and recommendations to make that process easier and more successful. I’m joined by Shawna Turner, General Manager, with Direct Colors to find out best practices for pouring acid stain ready concrete. Welcome, Shawna.

Shawna Turner:  Thank you.

Amie Nolen:

What’s the first thing a customer needs to do to get started?

ST:  The first thing to do is have a conversation with your general contractor (GC). Make sure he or she understands your plan to acid stain and what that means for the overall construction process.  Preparing to acid stain begins before the concrete is poured so it should be discussed with the general contractor in the planning stage.

AN:

You mentioned preparing to acid stain before pouring the concrete. What does that mean?

ST:  Well, not all concrete is created equal.  Depending on where you live, concrete can contain additives and/or fly ash that negatively impact the acid staining process so it’s imperative that you know what’s going in your concrete BEFORE it’s poured.  How do you do that?  Either the homeowner or their contractor needs to call the ready mix company pouring the concrete to ask for the mix design details. The concrete should not include retarders, accelerators or more than 10% fly ash if it is to be successfully acid stained later. None of these additives are essential but are often used when temperatures are very hot or cold and to cut costs in the case of the fly ash. I’d also avoid using a topical curing compound unless it is self-dissipating and will evaporate within two weeks of application.

AN:

That’s very helpful information. What about finishing the concrete?  I know that’s also an important part of the process.

ST:  You’re right. Finishing the concrete properly will yield better final staining results. The best option for indoor floors or patios is either a hand-troweled or light machine trowelled finish.  Stamping or texturing concrete is fine too if you’re working outside.  The objective is to avoid making the concrete so smooth that acid stain can’t readily absorb into the pores. If the stain can’t absorb, the chemical reaction will not occur and the stain will simply wash off during the cleaning process. No one wants that to happen. Overly smooth concrete can be corrected using our Hard Trowel Floor Prep product after the fact if needed.

AN:

When should a customer plan to acid stain the concrete?

ST:  We usually don’t recommend acid staining until the concrete is fully cured or achieves a uniform light gray color. That could occur anytime after 20-28 days depending on weather conditions.  The concrete will need to be protected throughout the construction process. Overlapping cardboard works best to cushion blows and absorb spills should they occur. Spills and other contaminants on unprotected concrete only make the home or business owners job that much harder when it’s time to stain. Again, remind your GC to talk to every contractor about not marking the floor or making a mess. Covering the floor can make a big difference but nothing’s better or more effective than a conscientious contractor.

AN:

In the case of interior floors, at what point in the construction process would you acid stain?

ST:  The best time to uncover, clean, acid stain and seal the floors is after the dry wall has been hung but has not yet been mudded in. Dry wall mud is notoriously difficult to get off of concrete. Staining and sealing before that step is the better option for sure.  Once the floors have been stained, neutralized and cleaned, apply one coat of sealer. I prefer the Sprayable Satin Finish Concrete Sealer because it’s so easy to apply and dries quickly. Six hours after application cover again with overlapping cardboard and continue with construction.

AN:

At what point should the finishing coats of sealer and wax be applied?

ST:  Just before the baseboards are installed, remove the cardboard, clean thoroughly and apply another coat of sealer. The second coat of sealer will repair most minor scratches on the surface and add additional luster. 24-48 hours later apply three coats of concrete wax and allow to dry for 24 hours before moving in furniture. A polyurethane sealer could also be applied after the second coat of sealer if desired. Wax would no longer be necessary in that case. I highly recommend our how to guide on care and maintenance of acid stained floors. Please give that a read before moving in to avoid unnecessary damage to the floors.

AN:  Thanks for this essential staining advice for new construction floors. If you have questions, call one of our expert technicians at 877-255-2656 and we’ll help you select the best products and technique for your needs.  If you prefer email, send in a free online design consultation and we’ll get back to you within 24-48 hours.

Direct Colors DIY Home Improvement podcasts are produced twice monthly for your enjoyment and show notes can be found at directcolors.com/listen.  Feel free to add the podcast to your favorite RSS feed.  You can also follow us on Twitter, Facebook, Google+ , YouTube and Instagram. Thanks again for joining us!

facebook
twitter
pinterest
linkedin
White Stained Concrete Floors

Podcast: What to Do About Carpet Tack Holes on Concrete Floors

You’re listening to Direct Colors podcast Episode 10: What to Do About Carpet Tack Holes on Concrete Floors. If this is your first time listening, then thanks for joining us.  We often receive questions about how to fix or hide carpet tack holes on concrete floors. Even with the greatest care, it’s difficult to avoid some damage when removing carpet tack strips from the concrete. Fear not! Direct Colors has a solution that will repair carpet tack holes and actually improve the final floor finish. We sat down with Direct Colors General Manager, Shawna Turner, to find out how to resolve this common decorative concrete problem.

Continue reading “Podcast: What to Do About Carpet Tack Holes on Concrete Floors”

facebook
twitter
pinterest
linkedin
You’re listening to Direct Colors podcast

Episode 11: How to Remove Oil Stains from Concrete.

If this is your first time listening, then thanks for joining us. One of the biggest challenges to acid staining garage floors, driveways and patios is oil stains in the concrete. Motor or vegetable oil and animal fats if the spill is around the barbeque can be very challenging to remove and unless properly removed will prevent acid stain, concrete stains or sealer from penetrating the concrete. Shawna Turner, General Manager, at Direct Colors joins us to talk about how to successfully dissolve oils in the concrete surface before staining and sealing. Let’s get started.

Continue reading “Podcast: How to Remove Oil Stains from Concrete”

facebook
twitter
pinterest
linkedin
Metallic Epoxy Countertop

Podcast: Marble Effects on Concrete Countertops with Ken Lazenby

You’re listening to Direct Colors podcast Episode 6: Marble Effects on Concrete Countertops. If this is your first time listening, then thanks for joining us. Getting just the right look on countertops can be a challenge so we thought we’d consult with a professional to see what tricks he might have up his sleeve. We sat down with Ken Lazenby with Ken’s Custom Designs based in Krebs, OK to talk about how he creates marble effects on concrete countertops. Learn how he makes builds and creates his concrete countertops.

Continue reading “Podcast: Marble Effects on Concrete Countertops with Ken Lazenby”

facebook
twitter
pinterest
linkedin
Poolside Bar Countertop and Swim Up Banana Bar Top Colored Concrete Stan Designs

Applying Acid Stain and Concrete Sealer During Summer

Applying acid stain and concrete sealer in the summer months can be challenging especially if you live in a hot temperature climate. Here are a few tips from our own General Manager, Shawna Turner, for outdoor concrete and countertop projects that will help DIYer’s get it right the first time.

Amie Nolen: Welcome to the podcast, Shawna.

Shawna Turner:  Thank you.

What are some of the challenges homeowners face when acid staining and sealing outdoor concrete in the summertime?

ST: Concrete temperature and wind conditions often determine success or failure for an acid stain project. Hot, dry conditions can cause acid stain to prematurely dry before properly reacting with the concrete. But how hot is too hot? Concrete shouldn’t be more than 75-80F for best staining results. Dry, windy conditions can wick the moisture from the concrete leaving a “blotchy” appearance behind particularly when using both light and dark colors.

What can be with our outdoor concrete besides wait until the fall?

ST:  Well, it’s not quite as bad as all that. The most important step for homeowners applying acid stain either late in the evening or early in the morning when concrete temperatures are at their lowest. As the day heats up, so does the concrete and air begins to pass through the surface. When temperatures are cooling, the concrete contracts and is therefore a better candidate for staining or sealing. Keep in mind that direct sunlight and ambient temperature are not the same. Lay a thermometer on the concrete surface and cover with a towel. If after 4-5 minutes the temperature is greater than 80°F, do not stain.

Another valuable tip is to lightly dampen not flood the concrete before applying acid stain to add moisture and prevent premature drying. Premature drying can retard color development and isn’t helpful if you’re working with multiple colors outdoors.

What about sealing specifically? I know hot temperatures can really cause problems. What should customers be looking out for?

ST: Without question, DO NOT attempt to seal in the heat of the day. Colored concrete in direct sunlight, especially dark browns and black, could be several times hotter than the ambient temperature and just a few minutes of sunlight will raise the surface temperature very quickly. If the concrete is too hot, small air bubbles will often appear either during the application or just after. The air bubbles are formed by air rising through the concrete and becoming trapped in the sealer. The bubbles will eventually collapse leaving unattractive concave spots behind. Not very attractive, especially on outdoor kitchen countertops.

Finding the right time of day to apply concrete sealer during the summer months can be a challenge. Sealers, like acid stain, should be applied when the concrete is at its lowest temperature either early in the morning or late in the evening. East facing concrete should be sealed later in the day and west facing early in the morning.

AN:  What time of year do you normally do “maintenance” on your decorative concrete?

ST: Never if I can get away with it! No, I’m kidding. I usually do my resealing in the late spring when you can get a couple of rain free days and if that fails, before winter sets in. Because I live in Oklahoma where the summers are very hot, I seldom attempt to seal my exterior concrete during the summer months. It can be done but most of the time I don’t want to get up that early.

AN: Thanks for the summertime acid staining and sealing advice. I hope everyone will listen in before beginning their projects this summer season. If you have questions, call one of our expert technicians at 877-255-2656 and we’ll help you select the best products and technique for your needs.  If you prefer email, send in a free online design consultation and we’ll get back to you within 24-48 hours.

Direct Colors DIY Home Improvement podcasts are produced twice monthly for your enjoyment and show notes can be found at directcolors.com/listen.  Feel free to add the podcast to your favorite RSS feed.  You can also follow us on Twitter, Facebook, Google+ , YouTube and Instagram. Thanks again for joining us!

facebook
twitter
pinterest
linkedin
Coffee N' Crafts Concrete stained and sealed floor with tinted concrete sealer

Podcast: Tinted Concrete Sealer for Fast, Easy Affordable Floor Renovation

You’re listening to Direct Colors Podcast Episode 39 – DCI Tinted Concrete Sealer for Fast, Easy Affordable Floor Renovation. If this is your first time listening, then thanks for joining us. We’re excited to be joined today by a local contractor, Cat Palmer with TCB Construction in McLoud, OK. Cat’s specialty is giving second life to damaged, distressed and downright ugly concrete floors. We frequently feature her floor renovation projects on our Facebook page and website. She’s here to tell us about the products she uses and the magic touch she brings to her work. Let’s hear from her how she gets the job done! Welcome to the podcast, Cat.

CP: Thanks for having me on today.

ST: Tell us a bit about yourself and your company, TCB Construction.

CP: In 2003, I started my business as “Creating Concrete Designs” focused on decorative flooring; however, with much success and growth a name change was necessary to accommodate all the services TCB Construction now offers.

ST: So, Cat, you’re known for taking on troubled concrete floors and turning them around. Tell us how you do your floor renovation projects.

CP: Years of practice (haha)… but I do have a special eye for turning troubled concrete floors around. I’m not afraid to turn troubled floors into a beautiful statement. I like the challenge, and with each one I grow in knowledge in the field. In this line of work, one must be willing to try new things, and not afraid to tackle any job, no matter if it’s a new slab of concrete, an old dilapidated and cracked floor, or a horrible mess that needs major rehabilitation. My knowledge of the many different chemicals and materials, and how they work together, is also a key to our success.

Tinted-Sealer-Floor-Renovation

Floor Renovation Projects Featuring Tinted Sealer and DC Concrete Dye

ST: What recommendations do have for DIYers with difficult floor or patio remodeling projects to help them get the best possible results?

CP: Everyone has a dream picture they find on the web; however, you have to keep in mind no two floors will ever be exactly the same when recreating. My advice is go in simple and follow the steps “exactly to a T”. Always test the concrete slab before moving forward with deciding on product to use. If a concrete slab already has product down, be sure you remove any product and clean the substrate thoroughly before adding any decorative concrete products and chemicals. Omitting critical surface prep steps can create bigger issues to overcome later. If you have ideas about the finished look, such as a picture from the Direct Colors Photo Galleries, share that with the Direct Colors staff or with your contractor to help them select the right products and give the best application advise possible for your project.

ST: What are you favorite Direct Colors products to work with?

CP: There are three different Sealers that I like working with. The water based sealer is odorless and it’s an easy application. I love the shine that the AC 1315 high gloss sealer gives but I do not recommend just anyone use this sealer, especially if one is going to be staying in the home during the project.

Concrete can be mixed cheaply with additives added which can result in spackling and chipping of the concrete in due time; but, the durability and appearance of the DCI Lithium Penetrating Hardener Sealer adds great protection and strength to the concrete and brings a great natural look to the surface protecting the concrete for many years to come.

When working with different color applications, for example, Tinted Water Based Sealer and DCI Concrete Dyes. Each product comes in an array of colors and when used correctly delivers a beautiful outcome for any slab of concrete. Tinted Sealer and Concrete Dye color applications are my go-to for any concrete slab.

ST: Finally, there aren’t a lot of women working professionally in the decorative concrete contracting. What words of wisdom would you offer to women considering working as a contractor for a living?

CP: Be confident in your knowledge and skill. I think woman make better Decorative Concrete Artisans because they are more in-tuned to the necessary prepping steps and how valuable these steps are to the outcome of the project.

Be prepared to take a chance. Hold your head high, hands on your hips and know that your decorative concrete artistic skill is a gift! They can always reach out to me or Direct Colors for support. Always ask first, if not sure. I love the support I get from the staff at Direct Colors. After 15-years, my knowledge has reached a level of Master Artisan; however, it is just as challenging as it was in the beginning. I Love this about this profession always creating a new floor master piece or correcting a trouble floor. Every job opportunity with Decorative Concrete is as it was in the beginning, gut wrenching until the final sealer goes on. If you follow the necessary steps, and be precise, taking a chance can only be good and you will grow in knowledge and confidence with each floor completed. Concrete Art – turning concrete into a beautiful floor!

ST: Thanks for those words of wisdom both on turning around difficult concrete floor renovation projects and to women considering decorative concrete contracting for a living. If you have questions, call one of our expert technicians at 877-255-2656 and we’ll help you select the best products and technique for your needs. If you prefer email, send in a free online design consultation and we’ll get back to you within 24-48 hours.

Direct Colors DIY Home Improvement podcasts are produced twice monthly for your enjoyment and show notes can be found at directcolors.com/listen. Feel free to add the podcast to your favorite RSS feed. You can also follow us on Twitter, Facebook, Google+ , YouTube and Instagram. I’m Tyler Thompson and thanks again for joining us!

facebook
twitter
pinterest
linkedin
Sealed Waxed Concrete Countertop

Care and Maintenance for Concrete Countertop Sealers

You’re listening to Direct Colors Podcast Episode 14 – Care and Maintenance for Concrete Countertop Sealers. If this is your first time listening, then thanks for joining us. Our customers often ask us how they can best take care of their concrete countertop sealers and keep them looking great. We’ve given some thought to this question and here to tell us more is Direct Colors General Manager, Shawna Turner. Continue reading “Podcast: Care and Maintenance for Concrete Countertop Sealers”

facebook
twitter
pinterest
linkedin

Podcast: Tips for Successfully Sealing Outdoor Countertops

You’re listening to Direct Colors podcast Episode 16: Tips for Successfully Sealing Outdoor Countertops. If this is your first time listening, then thanks for listening. After investing a great deal of time and effort into your countertop project, you want the last step to go smoothly. You may not realize that there are differences between successfully sealing indoor countertops and sealing outdoor countertops but there are and here to tell us all about it is Shawna Turner, General Manager for Direct Colors. Continue reading “Podcast: Tips for Successfully Sealing Outdoor Countertops”

facebook
twitter
pinterest
linkedin
Shifting Sand Acid Stain Sealed with Water Based Sealer

You’re listening to Direct Colors podcast Episode 13: Acid Staining Basement Floors. Basement floor remodels are fast becoming our number one DIY project here at Direct Colors. We talk to customers everyday about the peculiarities of basement applications and recommend products based on each project’s individual circumstances. Shawna Turner author of Direct Colors How to Guide Acid Staining Basement Floors joins us to talk about basement projects.

Continue reading “Podcast: Acid Staining Basement Floors”

facebook
twitter
pinterest
linkedin

Podcast: Q&A Customers Ask Top Acid Staining Questions

You’re listening to Direct Colors podcast Episode 34:  Q&A  Customers Ask Top Acid Staining Questions If this is your first time listening, then thanks for listening.  I’m Shawna Turner, General Manager with Direct Colors.

Continue reading “Podcast: Q&A Customers Ask Top Acid Staining Questions”

facebook
twitter
pinterest
linkedin

Podcast: Applying Metallic Epoxy Countertop Sealer

You’re listening to Direct Colors podcast Episode 7: Applying Metallic Epoxy Countertop Sealer. Metallic epoxy finishes are new to Direct Colors. There are so many color and technique possibilities with metallics we wanted to discuss the technical details of the product to help our customers better understand how to use metallic epoxy for their own countertops. Here’s Direct Colors Design Technician, Justin Richardson, to talk about applying Metallic Epoxy Countertop Sealer for indoor countertop projects.

Continue reading “Podcast: Applying Metallic Epoxy Countertop Sealer”

facebook
twitter
pinterest
linkedin

Podcast: Tips for Acid Stain and Sealer Coverage on Outdoor Projects

You are listening to Podcast Episode 2: Tips for Acid Stain and Sealer Coverage on Outdoor Projects.  Sometimes it can be difficult to determine how much acid stain and sealer is needed for a given project. Outdoor concrete can be more rough and porous than indoor concrete so in today’s episode we’ll discuss some of the different projects and how to So let’s get started.

Continue reading “Podcast: Tips for Acid Stain and Sealer Coverage on Outdoor Projects”

facebook
twitter
pinterest
linkedin

Podcast: Acid Stain or Antiquing for an Outdoor Concrete Project?

It’s that time of year when our customers what their outdoor concrete to look its best. The question for today’s podcast is which product, acid stain or liquid colored antique concrete stain, is better for what project. Here to help us make that determination is Shawna Turner, General Manager with Direct Colors.

Continue reading “Podcast: Acid Stain or Antiquing for an Outdoor Concrete Project?”

x